制作无损检测参考标准和试块时表面光洁度的重要性(中英文)

表面光洁度使用测量系统量化结果来描述表面的粗糙度或不规则度。该系统涵盖范围广泛,从质地极其粗糙的表面一直到高度抛光的镜面表面。主要参数是粗糙度平均值,用“Ra”表示,即轮廓的算术平均偏差。数字越高,表面越粗糙。粗铣表面的粗糙度在 250 到 500 Ra µin(6.3 至 12.5 µm)范围内。使用带有溢流冷却液的表面磨床通过连续轻磨加工而成的光滑表面的光洁度在 16 至 32 Ra µin(0.4 至 0.8µm)范围内。16 至 500 Ra µin(0.4 至 12.5 µm)的范围涵盖了当今工业中大多数的机加工工具和零件。当然,超出该范围的极端情况也存在,但就无损检测 (NDT) 标准而言,这些情况很少见。
Surface finish describes the roughness or irregularity of a surface using a measurement system to quantify the results. This system covers a wide range from extremely rough-textured surfaces all the way to those that are highly polished, mirror-like surfaces. The predominant parameter is Roughness Average, denoted by “Ra,” which is the arithmetic mean deviation of a profile. The higher the number, the rougher the finish. Roughly milled surfaces will be in the 250 to 500 Ra µin (6.3 to 12.5 µm) range. Smooth surfaces machined by successive light passes on a surface grinder with flood coolant will yield finishes in the 16 to 32 Ra µin (0.4 to 0.8µm) range. The span of 16 to 500 Ra µin (0.4 to 12.5 µm) covers the majority of machined tools and parts in industry today. There are extremes beyond that range of course, but for purposes of Non-Destructive Testing (NDT) standards, they are rare.
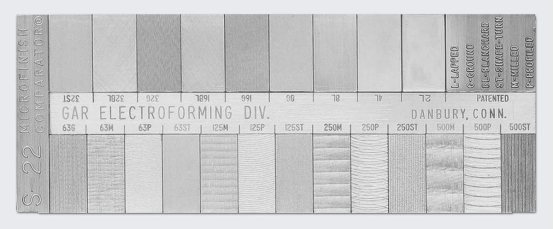
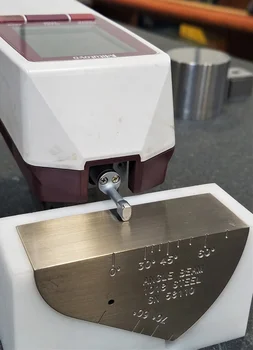
用于测量表面光洁度的主要仪器是轮廓仪。轮廓仪是一种接触式表面光洁度测量方法,采用自动驱动的触针划过零件表面。触针观察并记录表面的峰谷,通常与刻度垂直。刻度是指使用铣刀、砂轮、车床或其他工艺加工时形成的主导图案的方向。对于无方向性的加工方法,如电火花加工 (EDM),由于没有明确的方向需要考虑,所以方向性不太重要。另一种常用且更简单的估计表面光洁度的方法是使用表面光洁度比较仪。这种手持式测量仪包含一系列表面处理和方法的小样本,可以通过视觉与相关表面进行比较。虽然不如轮廓仪精确,但它是一种快速简便的方法来获得大致结果。

The primary instrument used to measure surface finish is a profilometer. The profilometer is a contact method of finish measurement that employs a stylus that is automatically driven across the part’s surface. The stylus observes and records the peaks and valleys of the surface, typically perpendicular to the lay. Lay is described as the direction of dominant pattern from machining with a milling cutter, grinding wheel, lathe, or other process. For non-directional machining methods such as electrical discharge machining (EDM), lay is less important as there is no clear direction to consider. Another common and simpler method for estimating surface finishes is to use a Surface Finish Comparator. This handheld gauge contains small samples of a range of finishes and methods that can be visually compared to the surface in question. While not nearly as precise as a profilometer, it is a fast and easy method to get in the ballpark.
当在独特的无损检测领域考虑表面光洁度时,需要记住一些事项。无损检测标准设计和制造规范中始终包含这样的规定:标准光洁度必须代表被测部件。对于特定应用的参考标准(火箭发动机部件、核反应堆螺柱、ASME 管道校准标准等),匹配的表面光洁度与被测部件具有相同的几何形状、合金、热处理条件、超声波速度或电磁电导率测量同样重要。
When we consider surface finish in our unique world of NDT, there are a few things to keep in mind. Specifications governing the design and manufacture of NDT standards always include language stating that the finish of the standard must be representative of the part under test. For application-specific reference standards (rocket engine components, nuclear reactor studs, ASME pipe calibration standards, etc), having a matching surface finish is just as important as having the same geometry, alloy, heat-treat condition, ultrasonic velocity or electromagnetic conductivity measurement as the component under test.
对于非代表性 NDT 标准(又名标准测试块),例如 IIW 型测试块、DSC 测试块和无数其他测试块,则采用不同的方法。这些是简化设计的通用工具,用于校准和标准化 NDT 仪器的响应。标准测试块的表面光洁度是需要考虑的重要因素,但与特定于应用的标准的原因不同。管理标准测试块的图纸和规范通常要求表面光洁度均匀、光滑,以便每次都能从测试仪器获得一致、可重复的响应。标准测试块的扫描表面通常具有 32 Ra 或更光滑的光洁度。为实现此目的,制造商必须在这些区域使用表面磨削技术。
There is a different approach for non-representative NDT standards (a.k.a. standard test blocks), such as the IIW-Type Block, DSC Block, and countless others. These are general purpose tools of a simplified design that are used to calibrate and standardize the response from an NDT instrument. Surface finish is important to consider on standard test blocks, but for a different reason than on application-specific standards. The drawings and specifications that govern standard test blocks typically call for a uniform, smooth finish that will yield a consistent, repeatable response from the testing instrument every time. The scanning surfaces of standard test blocks typically have a finish of 32 Ra or smoother. To achieve this, the manufacturer must use surface grinding techniques on those areas.
制定标准时忽略表面光洁度是确保标准不适合预期校准的必然方法。如果要检查的管道测量值为 125 Ra µin (3.2 µm),则没有 UT Level III 会希望使用表面抛光扫描表面测量值为 16 Ra µin (0.8 µm) 的管道标准进行校准。相反,使用过于粗糙的标准会导致失败。
Ignoring finish when making standards is a sure way to ensure your standard is not fit for the intended calibration. No UT Level III would want to calibrate on a pipe standard with a polished scanning surface measuring 16 Ra µin (0.8 µm) if the pipe to inspect measured 125 Ra µin (3.2 µm). Conversely, using a standard that is too rough for the job is a recipe for failure.
声明: - 文章转载自PH TOOL,由爱泽工业翻译,如有侵权,请联系删除!
- 如有偏颇,欢迎指正!

 沪公网安备31011002006738号

